Toneblocks Pt1
Overview
Toneblocks is a web-based musical creative coding environment, built with Tone.js and Blockly. Originally developed as my thesis project for the Master of Music in Music Technology requirements at NYU Steinhardt. It is the basis for a paper/poster/video presentated at NIME 2021 titled Toneblocks: block-based musical programming, co-authored with Willie Payne. Watch a brief video demonstration on Youtube, or play around with it on my site.
This is Part 1 of several posts taking a closer look at the application and its underlying mechanics.
Tone.js & Blockly
Essentially, Toneblocks combines two frameworks, Tone.js and Blockly, in a proof of concept project that seeks to make programming less daunting to novice users (thus, a block-based interface) interested in creating music with code (thus, synthesis with web audio).
Tone.js is a web audio JavaScript framework built for musicians and audio programmers looking to create interesting web-based audio applications. Particularly of interest to me was Tone.js’s synchronization abilities. Specifically, the Tone.js Transport is handy way to sync musical events in a more intuitive way than some other code-based audio environments. Tone.js is developed by Yotam Mann.
Blockly is a framework for creating block-based graphical user interfaces, similar to those found in Scratch, a popular block-based programming language developed at MIT with a large and active user base. Blockly is developed by Google.
Lets Make Something!
To get a sense of what’s going on here, we’re going to walk through three versions of a traditional “Hello World” program. First, we’ll get Tone.js set up and play our first musical note. Second, we’ll get Blockly set up and create our first block in a simple workspace. Finally, we’ll get these two tools working together and create a programmable block that plays a note.
Hello Tone
The Tone.js API documentation has lots of detailed information on what’s available, as well as some example projects and real world demos/applications. To get us started, we’l try implementing a simple Synth object that that plays a note when a button is pressed.
Create a project folder and a file index.html.
In our file, lets load in Tone.js from CDNJS with a <script> tag in the <head> section. Note the version and integrity hash may be different at the time you are reading this post.
<!DOCTYPE html>
<html lang="en">
<head>
...
    <!-- Load Tone.js -->
    <script src="https://cdnjs.cloudflare.com/ajax/libs/tone/14.8.26/Tone.js"
    integrity="sha512-+esjJ8NSEfoB5Sr8R7jTcYxCR1Bd6q9C+WQC0JA2UXVPT8Mlo/TJqqyp0qeeoxFzkAaa8t6tZCHLGmw3oNI2Qg=="
    crossorigin="anonymous"
    referrerpolicy="no-referrer">
    </script>
</head>
Now that Tone.js is loaded into our main file, we’ll be able to use it to create a synth. Lets do that in a new <script> tag in the <body> section.
<body>
    <script>
        // Create synth and route output to destination
        const synth = new Tone.Synth().toDestination();
    </script>
</body>
In the code above, we create a new variable of type const, assign it a new Tone.Synth() object, and connect the the synth’s output to the system’s main output (likely your speakers) using the toDestination() method.
We want the synth to play a note when we press a button. So lets create a button in the <body> section of the file. Then we can access the button in our <script> section and give it an on click function to trigger the synth.
Checking the Tone.js docs, Synth objects have a triggerAttackRelease() method which takes a pitch value and a duration value. We’ll use ‘C4’ for our pitch value, which is middle C on a piano, or ~261.63 Hz. And we’ll use ‘8n’ as our duration, so the tone will play for the length of an 8th note.
<body>
    <!-- Create button element -->
    <button id="play">Play</button>

    <script>
        // Create synth and route output to destination
        const synth = new Tone.Synth().toDestination();

        // Assign button variable to button element
        const button = document.getElementById('play');

        // Add "on click" function to play note when button is pressed
        button.addEventListener('click', () => {
            synth.triggerAttackRelease('C4', '8n');
        });
    </script>
</body>
So now if you run your index.html file in your browser, you should see a single button with “Play” displayed. And when you press it, you should hear an 8th note of Middle C. Hello Tone! 🎵
Hello Block
Next, we’re going to implement a Blockly workspace and print “Hello Block” when the workspace code is run. The Blockly API documentation has a breakdown of its many features, as well as examples and tools to help with creating your own environment.
First we’ll load Blockly with a few <script> tags just like we did for Tone.js.
<!DOCTYPE html>
<html lang="en">
<head>
...
    <!-- Load Tone.js -->
    <script src="https://cdnjs.cloudflare.com/ajax/libs/tone/14.8.26/Tone.js"
    integrity="sha512-+esjJ8NSEfoB5Sr8R7jTcYxCR1Bd6q9C+WQC0JA2UXVPT8Mlo/TJqqyp0qeeoxFzkAaa8t6tZCHLGmw3oNI2Qg=="
    crossorigin="anonymous"
    referrerpolicy="no-referrer">
    </script>

    <!-- Load Blockly -->
        <script src="https://unpkg.com/blockly/blockly_compressed.js"></script>
        <script src="https://unpkg.com/blockly/blocks_compressed.js"></script>
        <script src="https://unpkg.com/blockly/javascript_compressed.js"></script>
        <script src="https://unpkg.com/blockly/msg/en.js"></script>
</head>
In its barest form, Blockly requires a Workspace on your page within which you can click and drag blocks from a Toolbox, a list of avilable blocks. To get this set up, we need to create a few HTML elements in our <body> section so that Blockly can “inject” its workspace. The example blocks we’ll use in this Toolbox are taken from the Blockly docs.
<body>
    <!-- Create button element -->
    <button id="play">Play</button>

    <!-- Create Blockly elements -->
    <div id="blocklyDiv" style="height: 480px; width: 600px;"></div>
    <xml id="toolbox" style="display: none">
        <block type="math_number"></block>
        <block type="text"></block>
        <block type="text_print"></block>
      </xml>

    <script>...</script>
</body>
Now that the elements are there, we need to “inject” Blockly into the blocklyDiv element and associate the toolbox with it. We’ll do this in our main <script> tag inside of <body>
// Inject Blockly workspace
const workspace = Blockly.inject('blocklyDiv', {toolbox: document.getElementById('toolbox')});
Next we’ll create a function to run the code inside our Blockly workspace. We’ll reserve the word “code” so that if the user tries to create anything called “code” it won’t cause problems.
// Create function to evaluate Blockly code
function runCode() {

    // reserve "code" to avoid conflicts between the user's workspace and the page
    Blockly.JavaScript.addReservedWords('code');

    // Assign the contents of the workspace to the 'code' variable
    const code = Blockly.JavaScript.workspaceToCode(workspace);

    // Try to evaluate the code in the workspace, display any errors
    try {
        eval(code);
    } catch (e) {
        alert(e);
    }
}
Since we already have a button created from our Hello Tone section, we’ll make that same button run the Blockly workspace code when it’s pressed, simply by calling the runCode() function from the on click event listener.
// Add "on click" function to play note when button is pressed,
// and run the workspace code
button.addEventListener('click', () => {
    synth.triggerAttackRelease('C4', '8n');
    runCode();
});
So now your index.html should look similar to this:
<!DOCTYPE html>
<html lang="en">
<head>
    <meta charset="UTF-8">
    <meta http-equiv="X-UA-Compatible" content="IE=edge">
    <meta name="viewport" content="width=device-width, initial-scale=1.0">
    <title>Toneblocks Pt1</title>

        <!-- Load Tone.js -->
        <script src="https://cdnjs.cloudflare.com/ajax/libs/tone/14.8.26/Tone.js" integrity="sha512-+esjJ8NSEfoB5Sr8R7jTcYxCR1Bd6q9C+WQC0JA2UXVPT8Mlo/TJqqyp0qeeoxFzkAaa8t6tZCHLGmw3oNI2Qg==" crossorigin="anonymous" referrerpolicy="no-referrer"></script>

        <!-- Load Blockly -->
        <script src="https://unpkg.com/blockly/blockly_compressed.js"></script>
        <script src="https://unpkg.com/blockly/blocks_compressed.js"></script>
        <script src="https://unpkg.com/blockly/javascript_compressed.js"></script>
        <script src="https://unpkg.com/blockly/msg/en.js"></script>
</head>
<body>

    <!-- Create button element -->
    <button id="play">Play</button>

    <!-- Create Blockly elements -->
    <div id="blocklyDiv" style="height: 480px; width: 600px;"></div>
    <xml id="toolbox" style="display: none">
        <block type="controls_if"></block>
        <block type="controls_repeat_ext"></block>
        <block type="logic_compare"></block>
        <block type="math_number"></block>
        <block type="math_arithmetic"></block>
        <block type="text"></block>
        <block type="text_print"></block>
      </xml>

    <script>

        // Create synth and route output to destination
        const synth = new Tone.Synth().toDestination();

        // Assign button variable to button element
        const button = document.getElementById('play');

        // Add "on click" function to play note when button is pressed,
        // and run the workspace code
        button.addEventListener('click', () => {
            synth.triggerAttackRelease('C4', '8n');
            runCode();
        });

        // Inject Blockly workspace
        const workspace = Blockly.inject('blocklyDiv', {toolbox: document.getElementById('toolbox')});

        // Create function to evaluate Blockly code
        function runCode() {

            // reserve "code" to avoid conflicts between the user's workspace and the page
            Blockly.JavaScript.addReservedWords('code');

            // Assign the contents of the workspace to te 'code' variable
            const code = Blockly.JavaScript.workspaceToCode(workspace);

            // Try to evaluate the code in the workspace, display any errors
            try {
                eval(code);
            } catch (e) {
                alert(e);
            }
        }

    </script>

</body>
</html>
Load the file in a browser window, you should see the Play button and a Blockly workspace with example blocks. Try dragging the print block into the workspace. Then connext the empty text block to that and type in “Hello Block”. Click the Play button and you will hear the tone and get an alert displaying “Hello Block”. It should look similar to beow:

A Tone Block
For the final section, we’ll create a custom Blockly block. This block will create a new Synth object, and have an input for a MIDI note number, supply by a separate number block. When the Blockly workspace code is run, the synth will play an 8th note with the equivalent pitch of the input MIDI number.
With Blockly, every block needs a definition to dictate the shape, color, inputs, text, etc. of our block, and a generator function to handle the code that is added to the workspace when the block is created. As always, consult the developer’s docs when using their API. Blockly’s is thorough! We’ll start by creating a file synth.js in our directory. And we’ll define our custom block in JavaScript format (you can also use JSON).
// Define the block
Blockly.Blocks['synth'] = { // Name it "synth"
    init: function () {
        this.appendDummyInput()
            .appendField("Synth"); // Label the block
        this.appendValueInput('PITCH') // Name the input value
            .setCheck('Number') // Check that it is a number
            .appendField('MIDI Note'); // Label the input
    }
};
Next we write the generator function. You’ll notice this gets a little bit weird. We need to write some JavaScript code to get the pitch value from the input and check its type and range. Ultimately we want the block to create a new Synth object, read the pitch value from a seperate number block, and trigger a note. But we want the actual note triggering to happen when we click our Play button. In order to do that, we have to encapsulate the relevant code as a string, and return this to our workspace. That way, the instructions to create the synth and play the note are all there when the runCode() function is called. So in our synth.js file, just below our definition, the generator function looks like this:
// Generator function called when the block is dragged into the workspace
Blockly.JavaScript['synth'] = function (block) {

    // Get the pitch value from the input, convert it to an integer, or null if no value is present
    const pitch = parseInt(Blockly.JavaScript.valueToCode(block, 'PITCH', Blockly.JavaScript.ORDER_FUNCTION_CALL)) || null;

    // Check that the pitch value is in range 0 - 127
    if (pitch < 0 || pitch > 127 || pitch === null) {
        return `alert("MIDI Number must be between 0 and 127")`
    }

    // Assign the code to be returned to the workspace as text
    // This will then be evaluated when runCode() is called
    const code =
    `
    // Create new synth object, route to destination (speakers)
    const synth = new Tone.Synth().toDestination();

    // Convert MIDI pitch value to frequency (Hz) and trigger an 8th note
    synth.triggerAttackRelease(Tone.Frequency(${pitch}, "midi"), '8n');
    `;

    // returns the text of the code we want added to the workspace
    return code;
};
Now our custom synth block is all set. We just need to load it into our main index.html file and remove the old synth and trigger code (since we’re doing that in the custom block now).
Load in the custom block in the <head> section below Tone.js and Blockly:
<!-- Load Custom Block -->
<script src="synth.js"></script>
Add the synth block to your toolbox:
<xml id="toolbox" style="display: none">
    <block type="math_number"></block>
    <block type="text"></block>
    <block type="text_print"></block>
    <!-- our new custom synth block! -->
    <block type="synth"></block>
</xml>
Since we’re handling the synth in it’s own block, we can remove the original one we made and also remove the triggerAttackRelease() from the button’s on click function. Instead that will all happen when we call runCode().
The last thing to do is to have our button click start the Tone audio context. Most browsers won’t allow audio to play until the user takes some kind of action. Since we’re using the same button to create and trigger our audio, there could be some issues with the audio attempting to trigger before its been allowed. To avoid this, we’ll call Tone.start() right before we run our code, and we’ll give the on click function an asyc/await to make sure we’re all set before evaluating the workspace code.
// Add "on click" function to start audio context and call runCode
button.addEventListener('click', async () => {
    await Tone.start();
    runCode();
});
And that’s it! Now we have a custom synth block which takes a MIDI Note number value and plays an 8th note at the corresponding pitch when you click Play. The full index.html file should be something like:
<!DOCTYPE html>
<html lang="en">
<head>
    <meta charset="UTF-8">
    <meta http-equiv="X-UA-Compatible" content="IE=edge">
    <meta name="viewport" content="width=device-width, initial-scale=1.0">
    <title>Toneblocks Pt1</title>

        <!-- Load Tone.js -->
        <script src="https://cdnjs.cloudflare.com/ajax/libs/tone/14.8.26/Tone.js" integrity="sha512-+esjJ8NSEfoB5Sr8R7jTcYxCR1Bd6q9C+WQC0JA2UXVPT8Mlo/TJqqyp0qeeoxFzkAaa8t6tZCHLGmw3oNI2Qg==" crossorigin="anonymous" referrerpolicy="no-referrer"></script>

        <!-- Load Blockly -->
        <script src="https://unpkg.com/blockly/blockly_compressed.js"></script>
        <script src="https://unpkg.com/blockly/blocks_compressed.js"></script>
        <script src="https://unpkg.com/blockly/javascript_compressed.js"></script>
        <script src="https://unpkg.com/blockly/msg/en.js"></script>

        <!-- Load Custom Block -->
        <script src="synth.js"></script>
</head>
<body>

    <!-- Create button element -->
    <button id="play">Play</button>

    <!-- Create Blockly elements -->
    <div id="blocklyDiv" style="height: 480px; width: 600px;"></div>
    <xml id="toolbox" style="display: none">
        <block type="math_number"></block>
        <block type="text"></block>
        <block type="text_print"></block>
        <block type="synth"></block>
      </xml>

    <script>

        // Assign button variable to button element
        const button = document.getElementById('play');

        // Add "on click" function to start audio context and call runCode
        button.addEventListener('click', async () => {
            await Tone.start();
            runCode();
        });

        // Inject Blockly workspace
        const workspace = Blockly.inject('blocklyDiv', {toolbox: document.getElementById('toolbox')});

        // Create function to evaluate Blockly code
        function runCode() {

            // reserve "code" to avoid conflicts between the user's workspace and the page
            Blockly.JavaScript.addReservedWords('code');

            // Assign the contents of the workspace to te 'code' variable
            const code = Blockly.JavaScript.workspaceToCode(workspace);

            // Try to evaluate the code in the workspace, display any errors
            try {
                eval(code);
            } catch (e) {
                alert(e);
            }
        }

    </script>

</body>
</html>
In a browser, it should look something like this, and play the pitch value you supply:
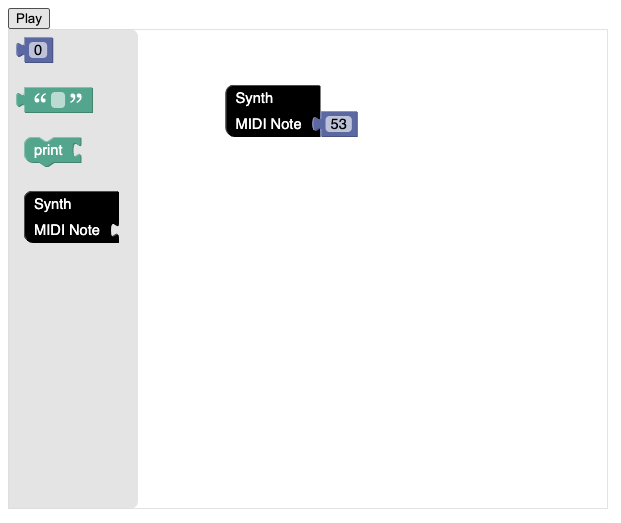
Thanks for following along! This was a simplified look at the basic mechanics underlying Toneblocks: using Blockly to interface with Tone.js and create music with code in the browser. In future posts I’ll take a closer look at the specific blocks constructed for the application, like Synth, Volume, and scheduling Loops with the Tone.Transport.